Docker
This guide will help you to deploy solidtime using Docker and Docker Compose. It uses our official Docker images that are available on Docker Hub. We have a repository with some example configurations for Docker Compose. You can find it here. The guide will reference this repository.
Prerequisites
Preparation
Before you start you need to ask yourself a few questions:
Do I have a database?
Some people might already have a managed Postgres database that they want to use for solidtime. If you don't have a database yet, you can look at the example with a Postgres container in the repository. Self-hosting a database is a whole other topic and we won't cover it in this guide. If you plan to use solidtime in a production environment and you don't have experience managing a database server, we recommend using a managed database service. If you plan on using one database server for multiple applications, you should consider using a separate database for each application with different credentials that only have access to one of the databases.
What do I want to use to send the email that solidtime is sending?
Solidtime sends emails for notifications and password resets. You need to configure an SMTP server to send these emails. If you don't have your own SMTP server, which is probably the case for most people, you can use a transactional email service.
What do you want to run before the solidtime containers?
The solidtime docker image contains a webserver, but the image is not meant to handle things like SSL certificates, etc. The image is designed to be run behind a reverse proxy like Nginx or Traefik. If you don't have a reverse proxy yet, you can use the example with Traefik in the repository.
Installation
1. Choose the example that fits your needs the best
The Self-Hosting example repository contains multiple examples for different setups. You can choose the one that fits your needs the best.
- Docker + Traefik + Database
- Docker + Database (+ your own reverse proxy or HTTP-only for local setups)
Read the instructions in the README of the example you chose.
If you use the images for a setup different from our examples, please keep in mind that the default service port of the solidtime container is 8000.
2. The environment files
The docker setup has two configuration files for the environment variables.
The laravel.env file contains the environment variables for the solidtime application and the .env file contains the environment variables for the docker compose config file.
The examples all contain template files that you can copy and adjust to your needs.
.env.example-->.envlaravel.env.example-->laravel.env
You need to adjust the environment variables in the .env and laravel.env files to your needs.
You can find for information about the environment variables in the configuration documentation.
3. Generate the application keys
You need to generate the application keys for your solidtime installation. You can do this by running the following command:
docker compose run scheduler php artisan self-host:generate-keys
This command will output random values for the APP_KEY, PASSPORT_PRIVATE_KEY, and PASSPORT_PUBLIC_KEY environment variables.
You can copy these values and add them to the laravel.env file.
4. Start the containers
After you have set up the environment files and generated the application keys, you can start the containers.
docker compose up -d
5. Migrate database
To create the database tables, you need to run the migrations. You can do this by running the following command:
docker compose exec scheduler php artisan migrate --force
You also need to do this after every update of the solidtime application.
If you have a simple setup with only one container, you can also configure the container to run the migrations on startup.
To do this you can set the environment variable AUTO_DB_MIGRATE to true in the docker-compose.yml file.
  app:
    # ...
    environment:
      CONTAINER_MODE: http
      AUTO_DB_MIGRATE: "true" # <--- Add this line
6. Access the application
You can now access the application in your browser. The URL depends on your setup.
To view the logs of the containers, you can use the following command:
docker compose logs -f
7. Create a user
Depending on your configuration of the APP_ENABLE_REGISTRATION environment variable, you can either create a user via the registration form or you need to create a user via the CLI.
Per default the registration is disabled.
You can create a user via the CLI with the following command:
docker compose exec scheduler php artisan admin:user:create "Firstname Lastname" "firstname.lastname@some-email-provider.test" --verify-email
More information about the CLI commands can be found in the CLI commands documentation.
If you want this first user to be a super admin, you can add the email address to the SUPER_ADMINS environment variable in the laravel.env file.
SUPER_ADMINS="firstname.lastname@some-email-provider.test"
The command output a random password for the user. Afterwards you need to restart the containers:
docker compose down && docker compose up -d
Then you should be able log in with the user you created.
If the user is a super admin, you can access the super admin panel via /admin.
More information about the super admin panel can be found in the super admin panel documentation.
8. Testing the setup (optional)
You can find information about how to test the setup in the testing documentation.
9. Activate Desktop client access (optional)
The solidtime Desktop client authenticates with the API with OAuth. The Desktop client needs a client. You can create a client by running the following command:
docker compose exec scheduler php artisan passport:client --name=desktop --redirect_uri=solidtime://oauth/callback --public -n
This command will output the client ID. Write down the client ID, you will need it to configure the Desktop client.
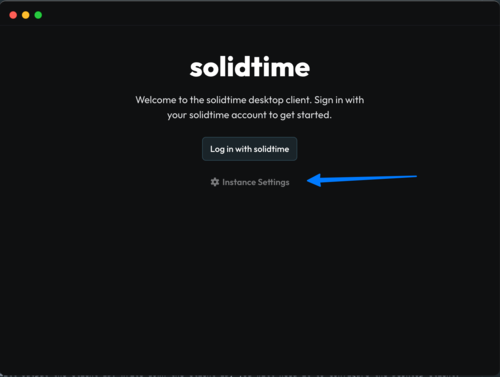
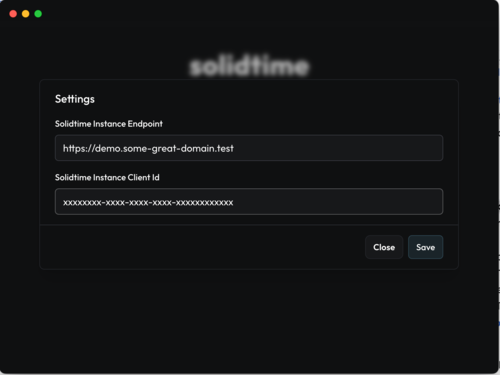
In the solidtime Desktop you can now Configure the API URL and the client ID. For that start the app and click on "Instance Settings".
There you can enter the API URL and the client ID.
10. Activate Browser Extensions access (optional)
The solidtime Browser Extensions authenticate with the API with OAuth. The Browser Extensions need a client. You can create a client by running the following command:
docker compose exec scheduler php artisan passport:client --name=browser-extension --redirect_uri=https://3369f72567118d8c03fb34880e9d6378d3b0c569.extensions.allizom.org/,https://hpanifeankiobmgbemnhjmhpjeebdhdd.chromiumapp.org/ --public -n
This command will output the client ID. Write down the client ID, you will need it to configure the Browser Extensions.
You can download the Browser Extensions from:
11. Activate API access via user API tokens (optional)
solidtime has a feature that allows users to create API tokens to access the API. This can be used to automate tasks or to create integrations with other services.
To activate this feature you need to create a OAuth client via the CLI.
docker compose exec scheduler php artisan passport:client --personal --name="API"
This command will create the client in the database. You only need to run this command once. Now users can create API tokens in the user settings. Read more about how you can create an API token and how to use the API here.
Update
To update solidtime, you can pull the latest image from the Docker registry.
- Change the tag of the image in the
docker-compose.ymlfile to the new version. If you are using thelatesttag, you don't need to change anything. - Pull the new image:
docker compose pull
- Recreate the containers:
docker compose up -d
- If you don't use the auto migration config, you need to run the migrations:
docker compose exec scheduler php artisan migrate --force
- Remove the old images. Docker images can use a lot of space and vServers often don't have a ton of storage. You can do this with the following command:
docker system prune -a -f
Postgres database
Collation version mismatch
If you get an error about a collation version mismatch, you need to update the collation of the database.
The warning might look like this:
WARNING: database "<your_database_name>" has a collation version mismatch
You can fix this by running the following command:
docker compose exec database psql -U <your_database_username>
This will open a Postgres shell. Then you can run the following command to update the collation:
REINDEX DATABASE <your_database_name>;

ALTER DATABASE <your-database-name> REFRESH COLLATION VERSION;